Testing with GitHub Actions
This tutorial will walk you through the following steps to create a QA Bot for your Unity project using GitHub Actions and GameCI:
- Add GitHub Actions workflow files to your project to enable Unity builds.
- Configure the GitHub Actions workflow files to work with GameCI and Regression Games.
- Add a test to your Unity project that will start and run your bot.
- Learn how to view test results.
This tutorial assumes you have some familiarity with GitHub Actions, and that you have a working bot within your game (see more on this in the Creating Bots in C# section). By the end of this tutorial, every push to your GitHub repo will build your Unity project and start bots for testing. You can find a working example in our sample repository, which has a GitHub Action configuration and Unity Test Runner file incorporating the ideas of this tutorial.
This guide is subject to change, as the product is an early preview. We are making changes based on your recommendations and feedback, so let us know what you think at info@regression.gg, or join our Discord. This particular tutorial is a first-pass at supporting CI/CD, but more features are coming soon to make this easier!
This feature requires a Unity license, as CI/CD builds for Unity are only available to those with a Unity license. If you want to use an existing CI/CD pipeline, you can skip ahead to the sections below regarding test configurations and test files.
Add GitHub Actions Workflow Files
GameCI provides a collection of GitHub Actions for building Unity projects. This is our foundation for running GitHub CI/CD builds for Unity.
Create a New Branch in Your Project
First, create a new branch in your project so that you can test out the GitHub Actions workflow files before committing them to your
main branch. You can name this branch anything, but we named ours qa-tests.
Follow the Steps on GameCI to Activate a Unity License
It is critical that you follow this step! This allows the CI/CD Docker images to properly start and use Unity. You can test that the license is configured properly by running this GitHub Action in your GitHub repository.
Add the Workflow File to Your Project
The workflow file is a GitHub Action that will build your Unity project and start a test that will run a bot. From step 2 above,
you should have a .github/workflows folder inside your project/repository. Inside of this folder, create a new file called
qa-bot.yml and paste the contents below. You can also download the file directly from here.
#file: .github/workflows/qa-bot.yml

name: Regression Games Bots QA 🤖

on: [push]

# See https://game.ci/docs/github/test-runner and RG_DOCS for more info
jobs:
  build:
    name: Build and run bots ✨
    runs-on: ubuntu-latest
    permissions: write-all # This is to allow writing results into the artifacts section of GitHub Actions
    steps:

      # Checkout (without LFS)
      - name: Checkout repository
        uses: actions/checkout@v3

      # Git LFS
      - name: Create LFS file list
        run: git lfs ls-files -l | cut -d' ' -f1 | sort > .lfs-assets-id

      - name: Restore LFS cache
        uses: actions/cache@v3
        id: lfs-cache
        with:
          path: .git/lfs
          key: ${{ runner.os }}-lfs-${{ hashFiles('.lfs-assets-id') }}

      - name: Git LFS Pull
        run: |
          git lfs pull
          git add .
          git reset --hard

      # Cache
      - uses: actions/cache@v3
        with:
          path: Library
          key: Library-${{ hashFiles('Assets/**', 'Packages/**', 'ProjectSettings/**') }}
          restore-keys: |
            Library-

      # Test
      # See https://game.ci/docs/github/test-runner for more information
      - name: Run tests
        uses: game-ci/unity-test-runner@v2
        env:
          UNITY_LICENSE: ${{ secrets.UNITY_LICENSE }}
        with:
          customParameters: -RG_BOT ${{ secrets.RG_BOT }} -RG_API_KEY ${{ secrets.RG_API_KEY }} -RG_HOST ${{ secrets.RG_HOST }}
          githubToken: ${{ secrets.GITHUB_TOKEN }}

      # Output
      - uses: actions/upload-artifact@v3
        with:
          name: Build
          path: build
Note that this will actually run all of your tests, not just the bot test. To configure this workflow to only
run the bot test, see the Unity Test Runner Command Line docs,
which has filter options that can be passed within customParameters within the Run tests step above. For example,
see the customParameters property below:
...
- name: Run tests
  uses: game-ci/unity-test-runner@v2
  env:
    UNITY_LICENSE: ${{ secrets.UNITY_LICENSE }}
  with:
    customParameters: -testFilter "<name of method to test>" -RG_BOT ${{ secrets.RG_BOT }} -RG_API_KEY ${{ secrets.RG_API_KEY }} -RG_HOST ${{ secrets.RG_HOST }}
    githubToken: ${{ secrets.GITHUB_TOKEN }}
...
Configure GitHub Actions
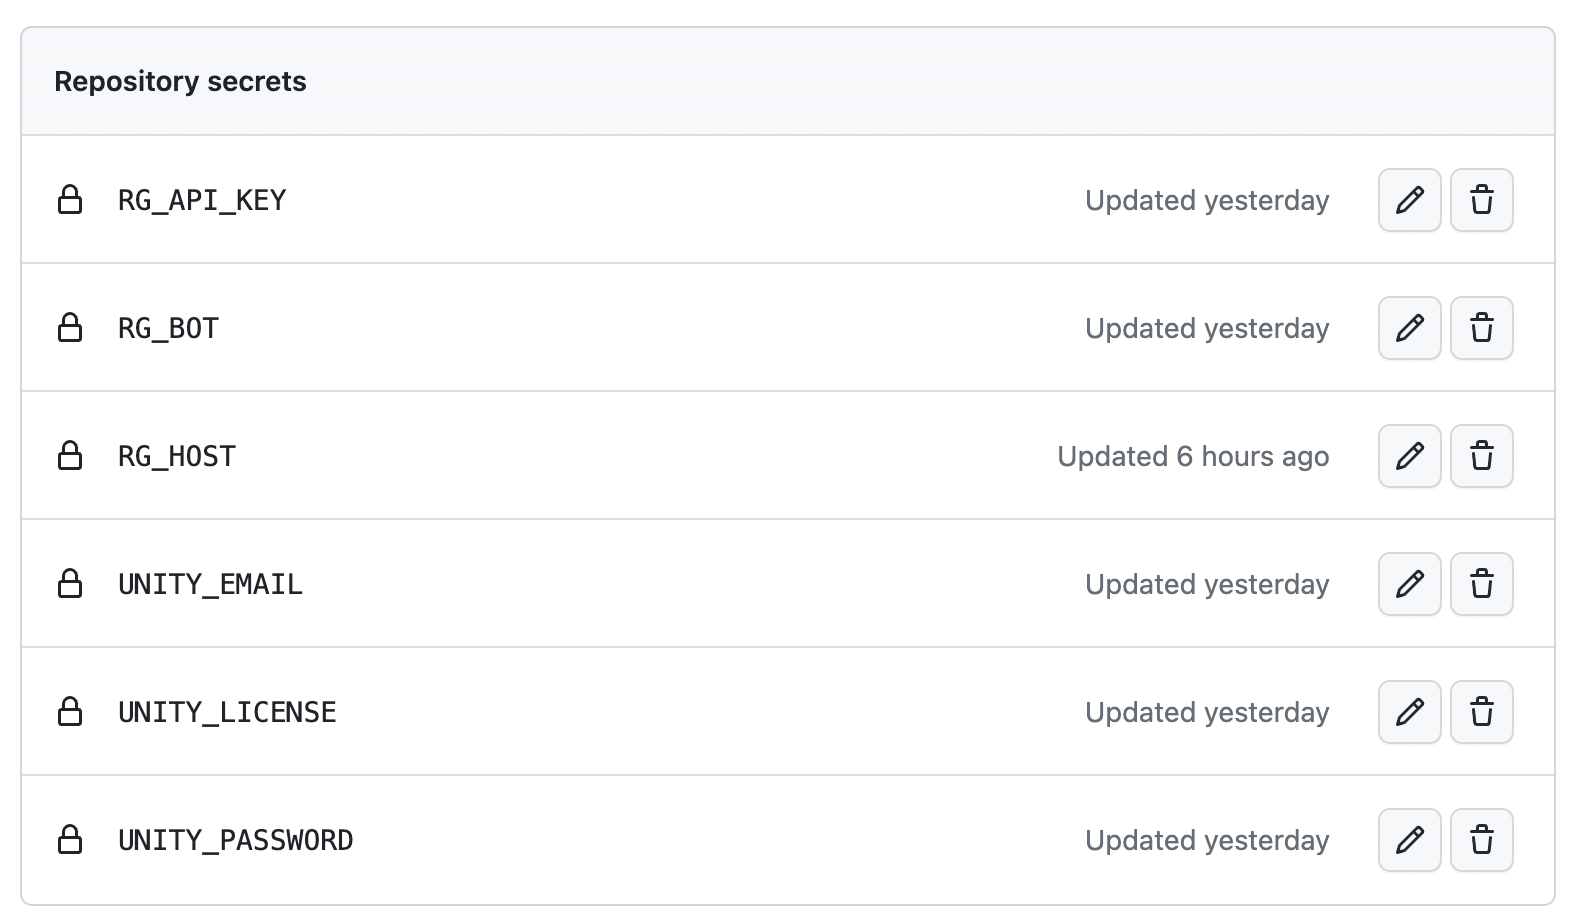
The final piece on the GitHub actions side is to configure the secrets that are used in the workflow file above. Visit the secrets page for your GitHub repository by going to your Repo > Settings > Secrets and variables > Actions. Add the following secrets by clicking the green New repository secret button.
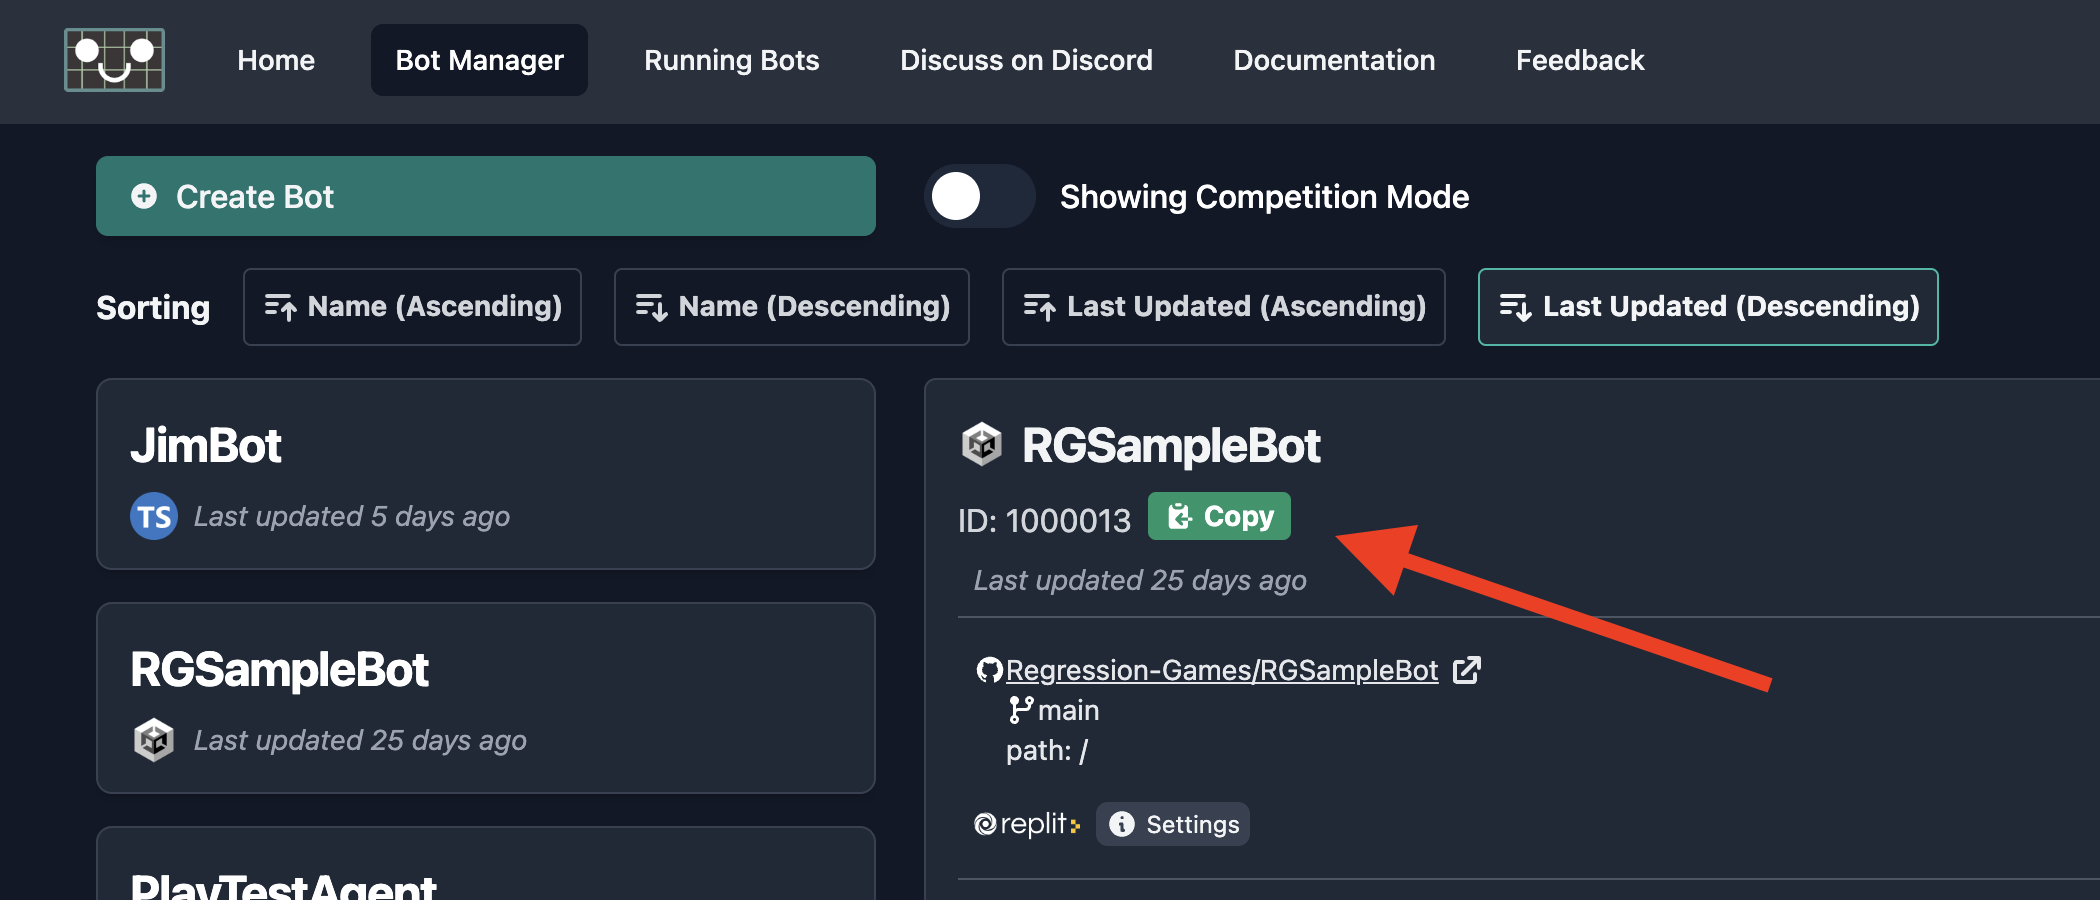
RG_HOST-https://play.regression.ggRG_API_KEY- Your API key from Regression Games, which can be found in your account settings. Full instructions for this can be found in the Authentication docs.RG_BOT- The ID of the bot you want to run. You can find this through the bot's details within the Regression Games Bot Manager page.
Once you are done adding these secrets, your secrets section should look similar to the following:
Add a Test to Your Unity Project
The bots are started via the Unity Test Runner in Play Mode, In this testing mode, the game starts as if you are playing it, and then terminates once the function finishes.
Complete the following steps to set up the required test - feel free to skip some of these steps if you have existing Play tests in your Unity project.
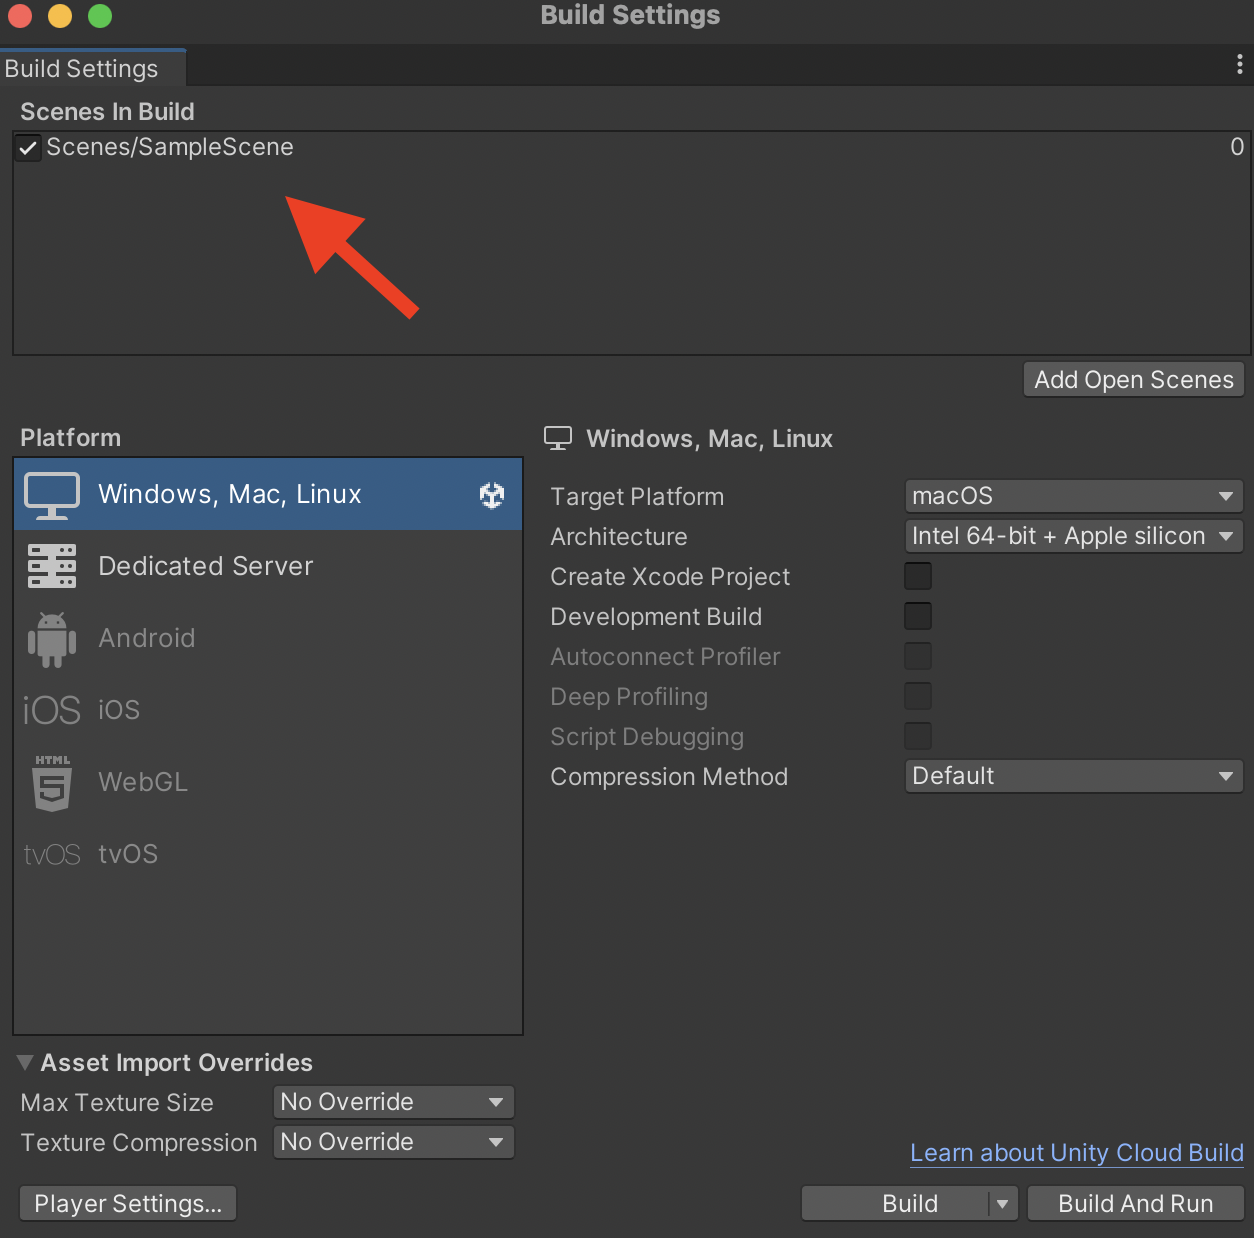
Add Your Scenes to Your Build
Before adding the test, make sure your desired test scenes are placed inside your build. You can add your scenes to the build using the menu option File > Build Settings.
Configure Test Runner for Your Project
Next, we need to configure the Unity Test Runner for your project. To do this, go to Window > General > Test Runner.
Then, in the pane that open, click Play Mode > Create PlayMode Test Assembly Folder. Create that tests folder with
the name Tests, and find that folder in your editor (e.g. Rider, Visual Studio). You should see a file called Tests.asmdef -
open that file and replace it with the contents below, which will include Regression Games as a dependency:
{
    "name": "Tests",
    "references": [
        "RegressionGames"
    ],
    "optionalUnityReferences": [
        "TestAssemblies"
    ]
}
You can learn more about the Test Runner and setup instructions here.
Create an RGBotTests File to Run Your Bot
=============================================================================
!!!!! The content of this section is outdated and will be updated soon !!!!!
=============================================================================
Within the Tests folder, create a new file called RGBotTests.cs and copy the following contents into the file.
Make sure to edit the file below to use the correct starting scene for your test! Update Scenes/SampleScene to
instead be the scene you are starting with.
Also, update defaultBotId to an ID of a bot that you'd like to start in your local editor. Remember, you can find
the ID of a bot within the Bot Manager page. You can also download the file
directly from here.
using System;
using System.Collections;
using System.Threading;
using NUnit.Framework;
using RegressionGames;
using UnityEngine;
using UnityEngine.SceneManagement;
using UnityEngine.TestTools;

public class RGBotTests
{

    private string timeNow()
    {
        return $"{DateTime.Now:yyyy-MM-ddTHH:mm:ss:ffff}  [{Thread.CurrentThread.ManagedThreadId}] --- ";
    }

    [UnityTest]
    public IEnumerator RunBotTest()
    {

        Debug.Log($"{timeNow()} Starting test");

        // Override this to change how long a test will wait for bots to join before failing
        const int QUEUE_TIMEOUT_IN_SECONDS = 30;
        const int CONNECT_TIMEOUT_IN_SECONDS = 60;
        const int TEST_RUN_TIMEOUT_IN_SECONDS = 300;

        // For in-editor purposes, feel free to define a default bot to use!
        int defaultBotId = 0;

        // NOTE: Make sure to fill in the name of the scene to start your test with!
        Debug.Log($"{timeNow()} Waiting for scene to load...");
        AsyncOperation asyncLoadLevel = SceneManager.LoadSceneAsync("Scenes/SampleScene", LoadSceneMode.Single);
        // Wait until the scene finishes loading, then wait a frame so every Awake and Start method is called
        while (!asyncLoadLevel.isDone)
        {
            yield return null;
        }
        yield return null;

        Debug.Log($"{timeNow()} Scene loaded");

        // Grab the bot to start (override with the one from CI/CD if defined)
        if (RGEnvConfigs.ReadBotId() != null)
        {
            defaultBotId = Int32.Parse(RGEnvConfigs.ReadBotId());
        }
        int[] botIds = {defaultBotId};
        Debug.Log($"{timeNow()} Loaded config, using bots {string.Join(", ", botIds)}");

        // do this before the queue
        RGBotServerListener.GetInstance().StartGame();

        // startup all the queue requests
        foreach (var botId in botIds)
        {
            Debug.Log(
                $"{timeNow()} Running task to spawn bot with ID: {botId}");
            var task = RGServiceManager.GetInstance()
                .QueueInstantBot((long) botId, (botInstance) =>
                {
                    RGBotServerListener.GetInstance().AddClientConnectionForBotInstance(botInstance.id, RGClientConnectionType.REMOTE);
                }, () =>
                {
                    Debug.LogError($"{timeNow()} Error starting bot with ID {botId}");
                });
            Debug.Log($"{timeNow()} Waiting for bot ID: {botId} to be queued (Completed: {task.IsCompleted}) ...");
            while (!task.IsCompleted)
            {
                yield return null;
            }
            var startTime = DateTime.Now;
            while (!task.IsCompleted &&
                   (DateTime.Now.Subtract(startTime).TotalSeconds < QUEUE_TIMEOUT_IN_SECONDS))
            {
                yield return null;
            }

            if (!task.IsCompletedSuccessfully)
            {
                Debug.LogWarning($"{timeNow()} Error running task to queue bot id: {botId}\r\n" +
                                 $"Status: {task.Status}\r\n" +
                                 $"AsyncState: {task.AsyncState}\r\n" +
                                 $"Completed: {task.IsCompleted}\r\n" +
                                 $"Canceled: {task.IsCanceled}\r\n" +
                                 $"Faulted: {task.IsFaulted}\r\n" +
                                 $"Exception: {task.Exception}");
                RGBotServerListener.GetInstance()?.StopGame();
                Assert.Fail($"{timeNow()} Bot id: {botId} failed to handle queue request within {QUEUE_TIMEOUT_IN_SECONDS} seconds");
            }
        }

        Debug.Log($"{timeNow()} All bot queue requests sent!");

        // Wait until at least one bot is connected. Fail the test if the connection takes too long
        Debug.Log($"{timeNow()} Waiting for bots to connect...");
        var beginTime = DateTime.Now;
        while (!RGBotServerListener.GetInstance().HasBotsRunning() &&
               (DateTime.Now.Subtract(beginTime).TotalSeconds < CONNECT_TIMEOUT_IN_SECONDS))
        {
            yield return null;
        }

        if (!RGBotServerListener.GetInstance().HasBotsRunning())
        {
            Debug.Log($"{timeNow()} Bots failed to connect within {CONNECT_TIMEOUT_IN_SECONDS} seconds");
            RGBotServerListener.GetInstance()?.StopGame();
            Assert.Fail($"{timeNow()} Bots failed to connect within {CONNECT_TIMEOUT_IN_SECONDS} seconds");
        }

        Debug.Log($"{timeNow()} Bots connected! Letting them run...");
        RGBotServerListener.GetInstance().SpawnBots();
        // Now run until all bots complete their tasks
        beginTime = DateTime.Now;
        while (RGBotServerListener.GetInstance().HasBotsRunning() &&
               (DateTime.Now.Subtract(beginTime).TotalSeconds < TEST_RUN_TIMEOUT_IN_SECONDS))
        {
            yield return null;
        }

        if (RGBotServerListener.GetInstance().HasBotsRunning())
        {
            Debug.Log($"{timeNow()} Bots failed to finish their test run within {TEST_RUN_TIMEOUT_IN_SECONDS} seconds");
            RGBotServerListener.GetInstance()?.StopGame();
            Assert.Fail($"{timeNow()} Bots failed to finish their test run within {TEST_RUN_TIMEOUT_IN_SECONDS} seconds");
        }

        Debug.Log($"{timeNow()} Test finished! Cleaning up");

        // Cleanup when done
        RGBotServerListener.GetInstance()?.StopGame();
    }

}
At a high level, this test is doing the following:
- Loading the scene, and waiting for it to start up before activating bots
- Queuing up a task that will start a bot and spawn it into the scene
- The test then waits for at least one bot to connect. If a bot does not connect within one minute, the test will fail.
- Once at least one bot is connected, the test runs until all bots complete their tasks (i.e. the bot calls
rg.complete()), or until the timeout is reached.
Test it out with an Existing Bot
=============================================================================
!!!!! The content of this section is outdated and will be updated soon !!!!!
=============================================================================
Our test is now setup! Before we commit and push our changes, let's test it out locally with an existing bot. To do this, you can
follow the first bot guide to create and configure a bot. As a quick test, you can make a bot that simply waits for a few seconds before completing its test. Note
that having your bot call rg.complete() is extremely important! Without this line of code, your bot will run forever!
export function configureBot(rg) {
  // No config for now
}

var startTime = null

export async function processTick(rg) {

  if (!startTime) startTime = new Date().getTime();

  if (new Date().getTime() - startTime > 5000) {
    // Now try to finish
    rg.complete();
  }

}
Pushing Your Changes
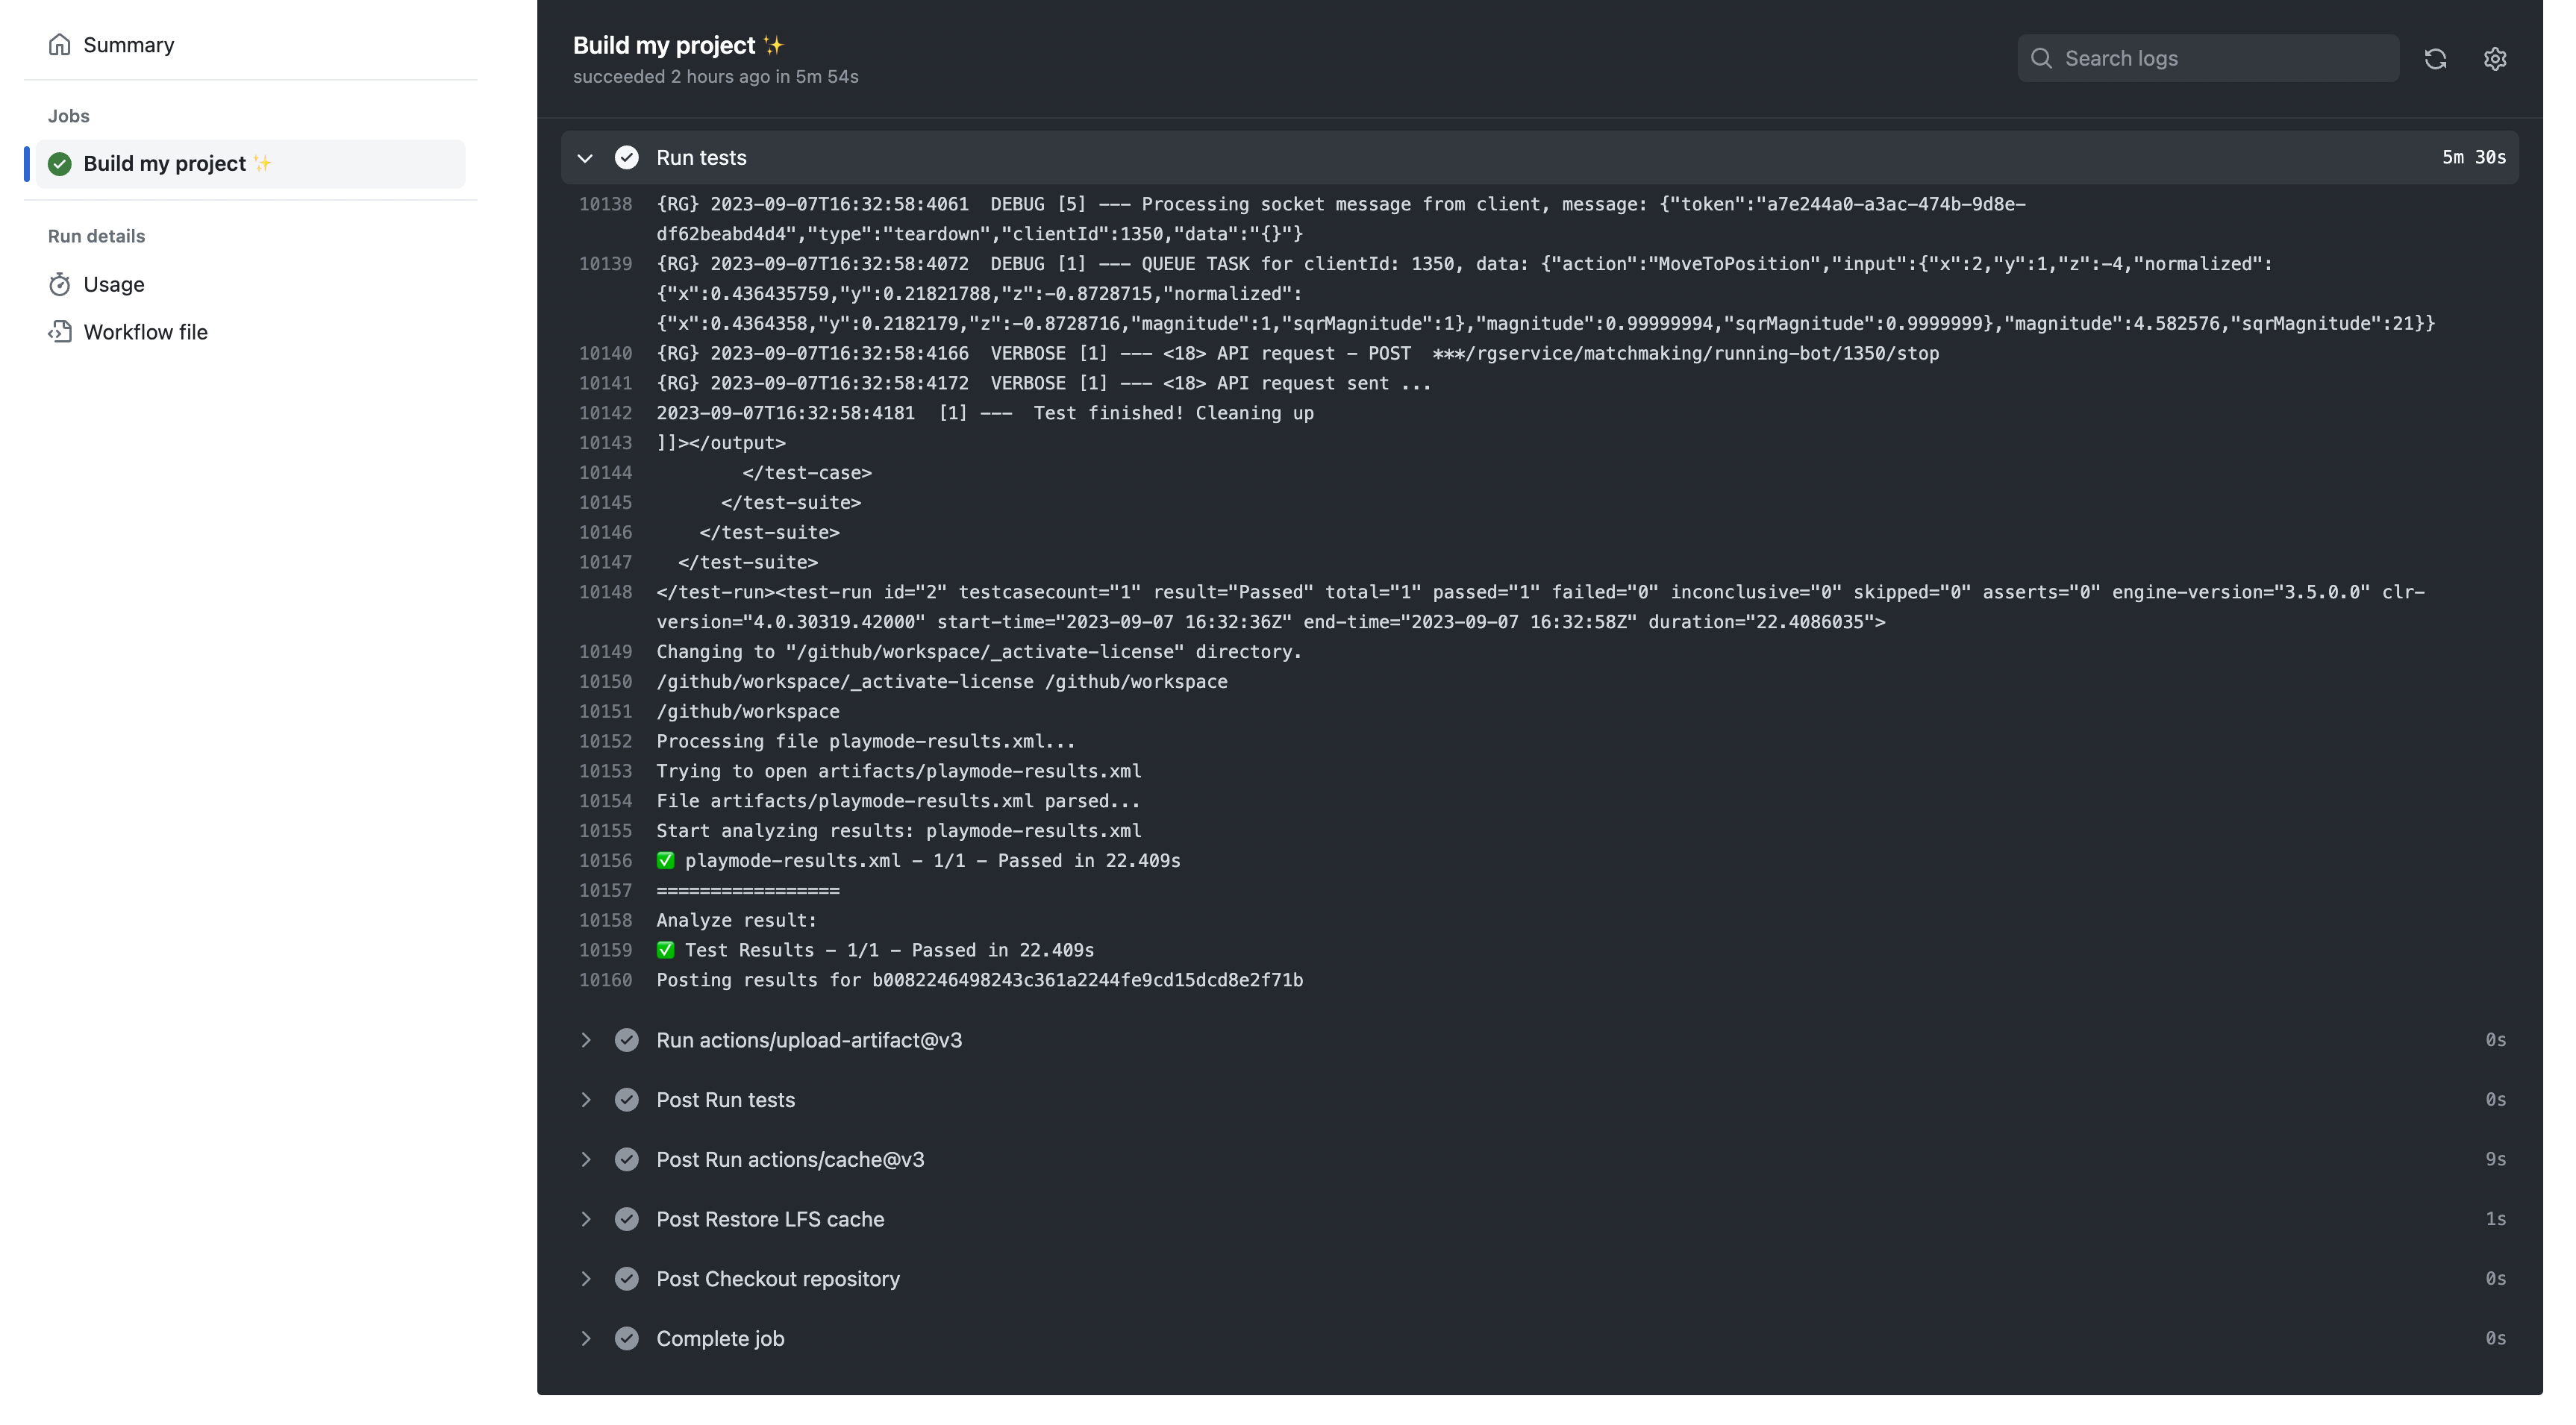
Once you are satisfied with your local test, you can commit and push your changes to your GitHub repository. This will trigger the GitHub Actions workflow, which will build your Unity project and start your bot. You can view the status of your workflow by going to the Actions tab of your GitHub repository.

Once your workflow has completed, you can view the results of your test by clicking on the Build my project step of your workflow. You should see that the bot successfully started and executed!
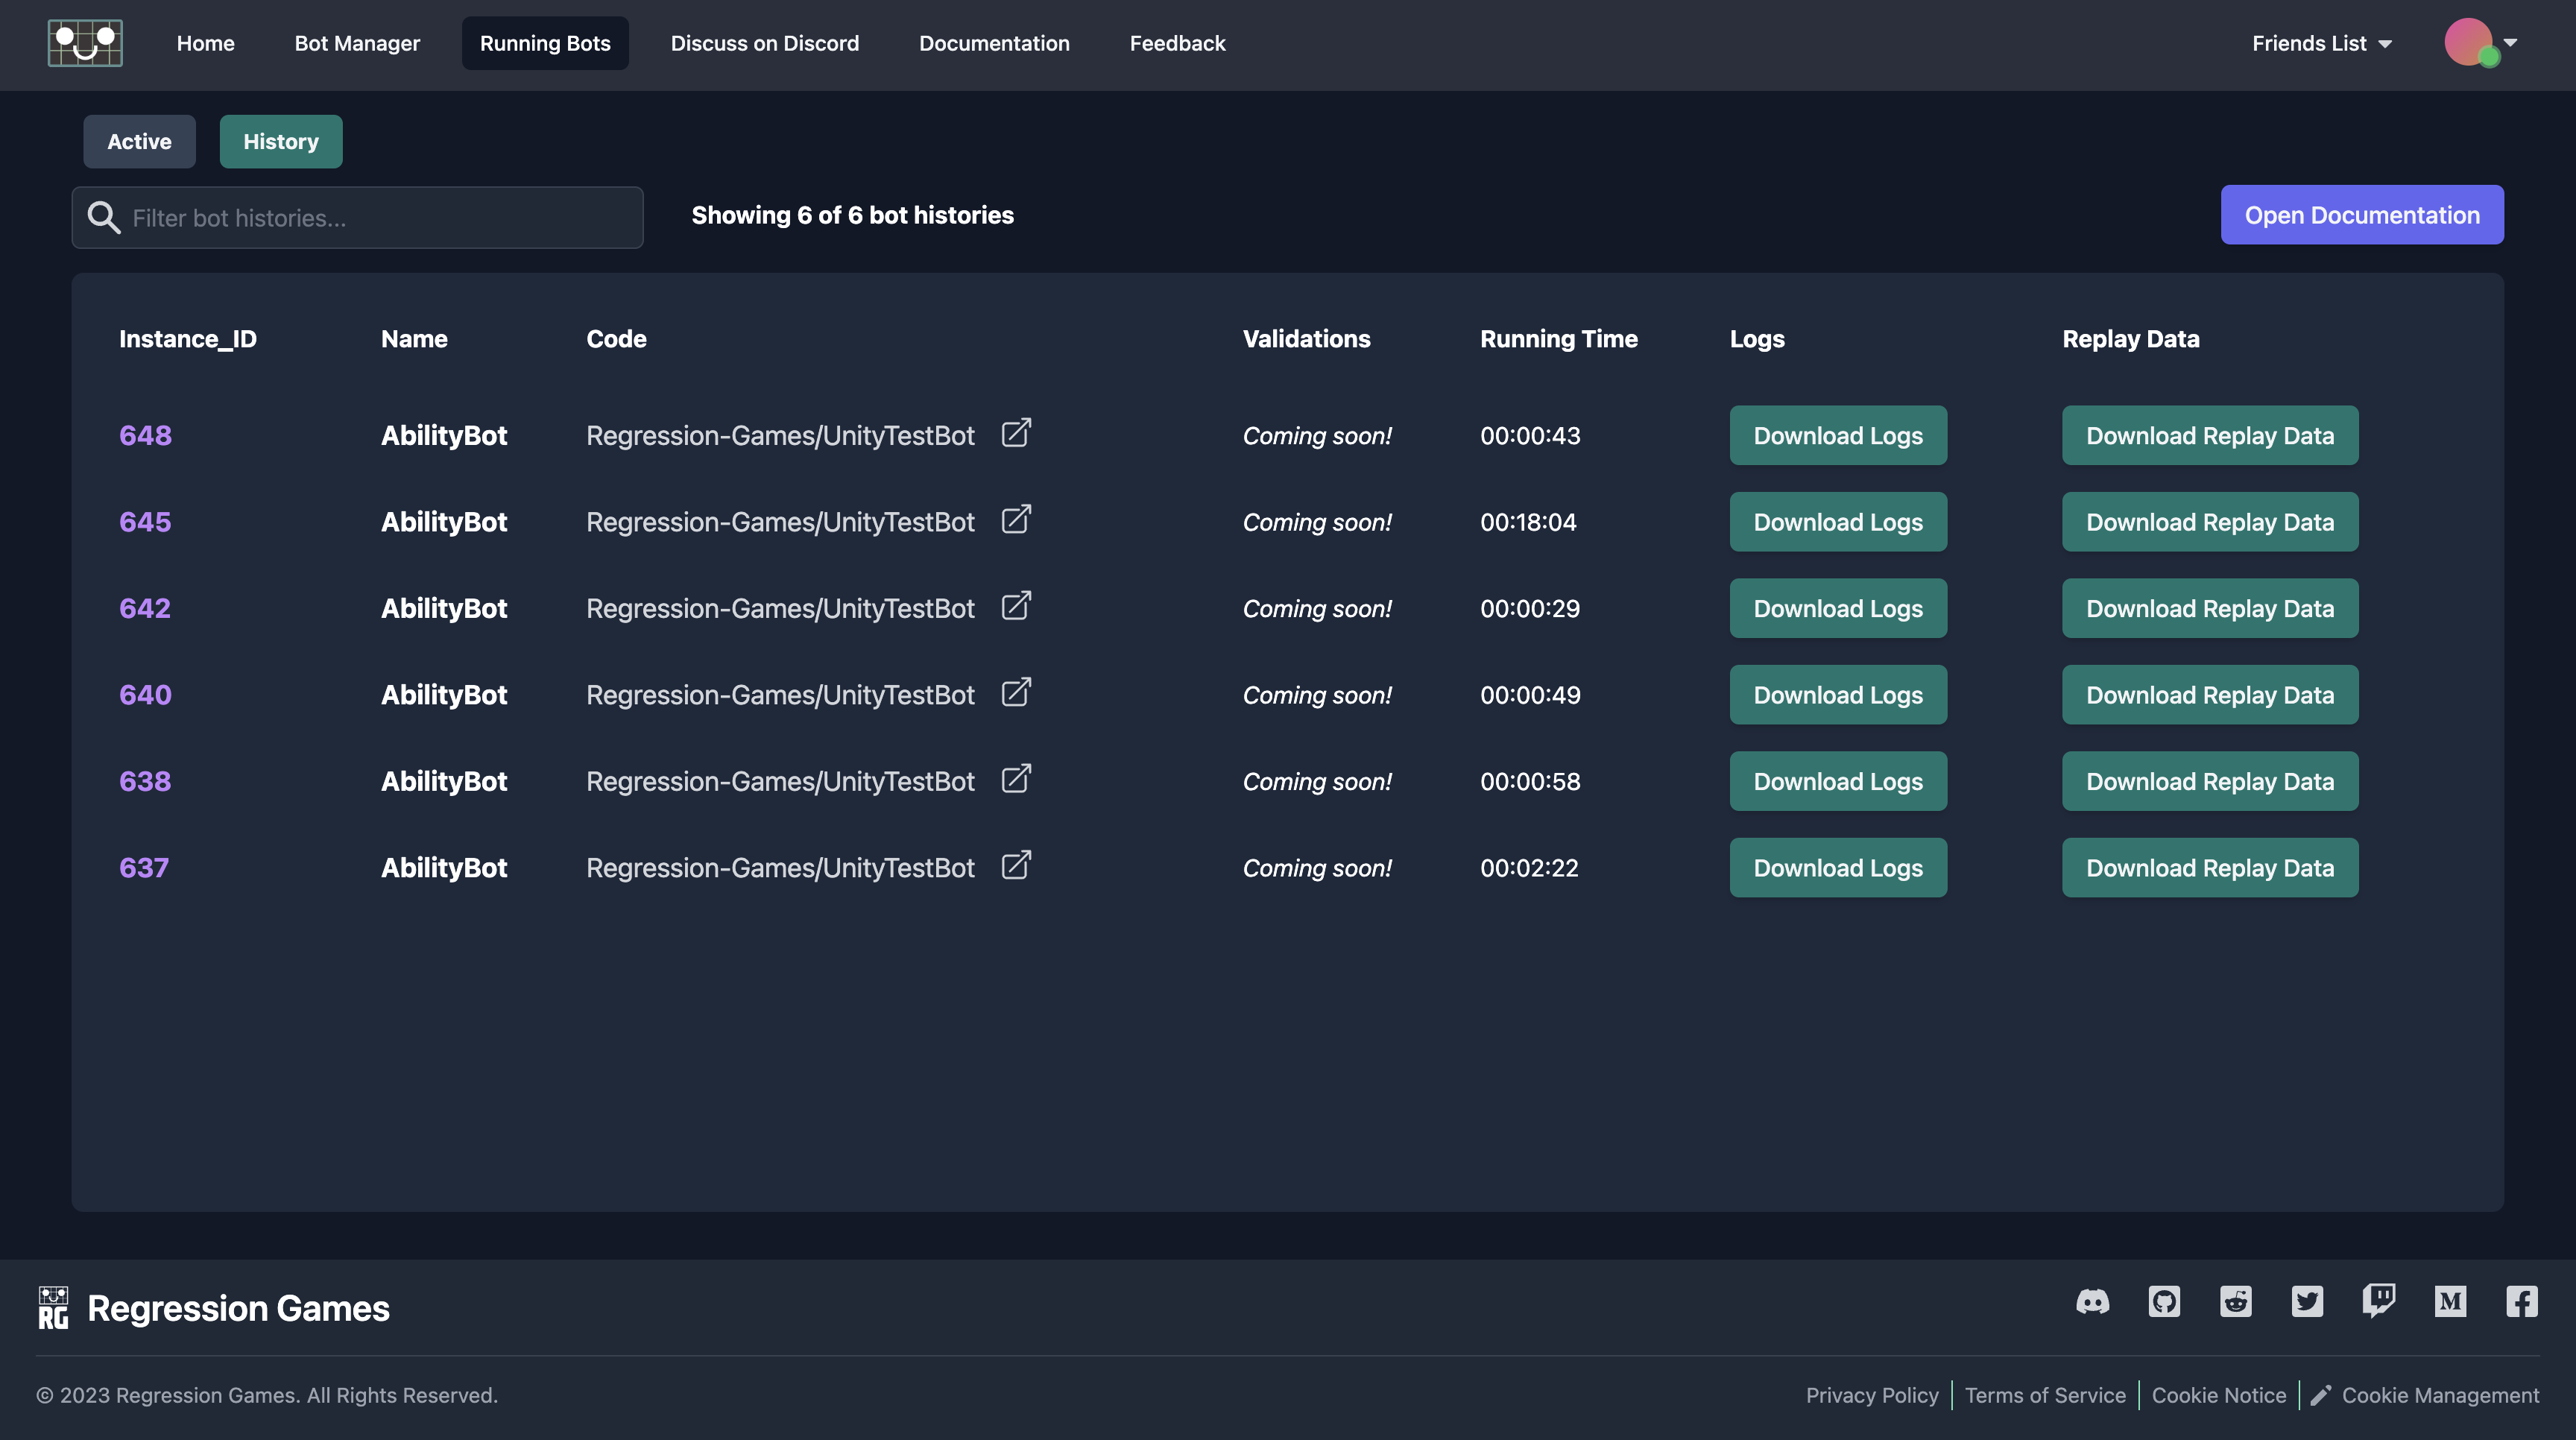
Viewing Test Results
=============================================================================
!!!!! The content of this section is outdated and will be updated soon !!!!!
=============================================================================
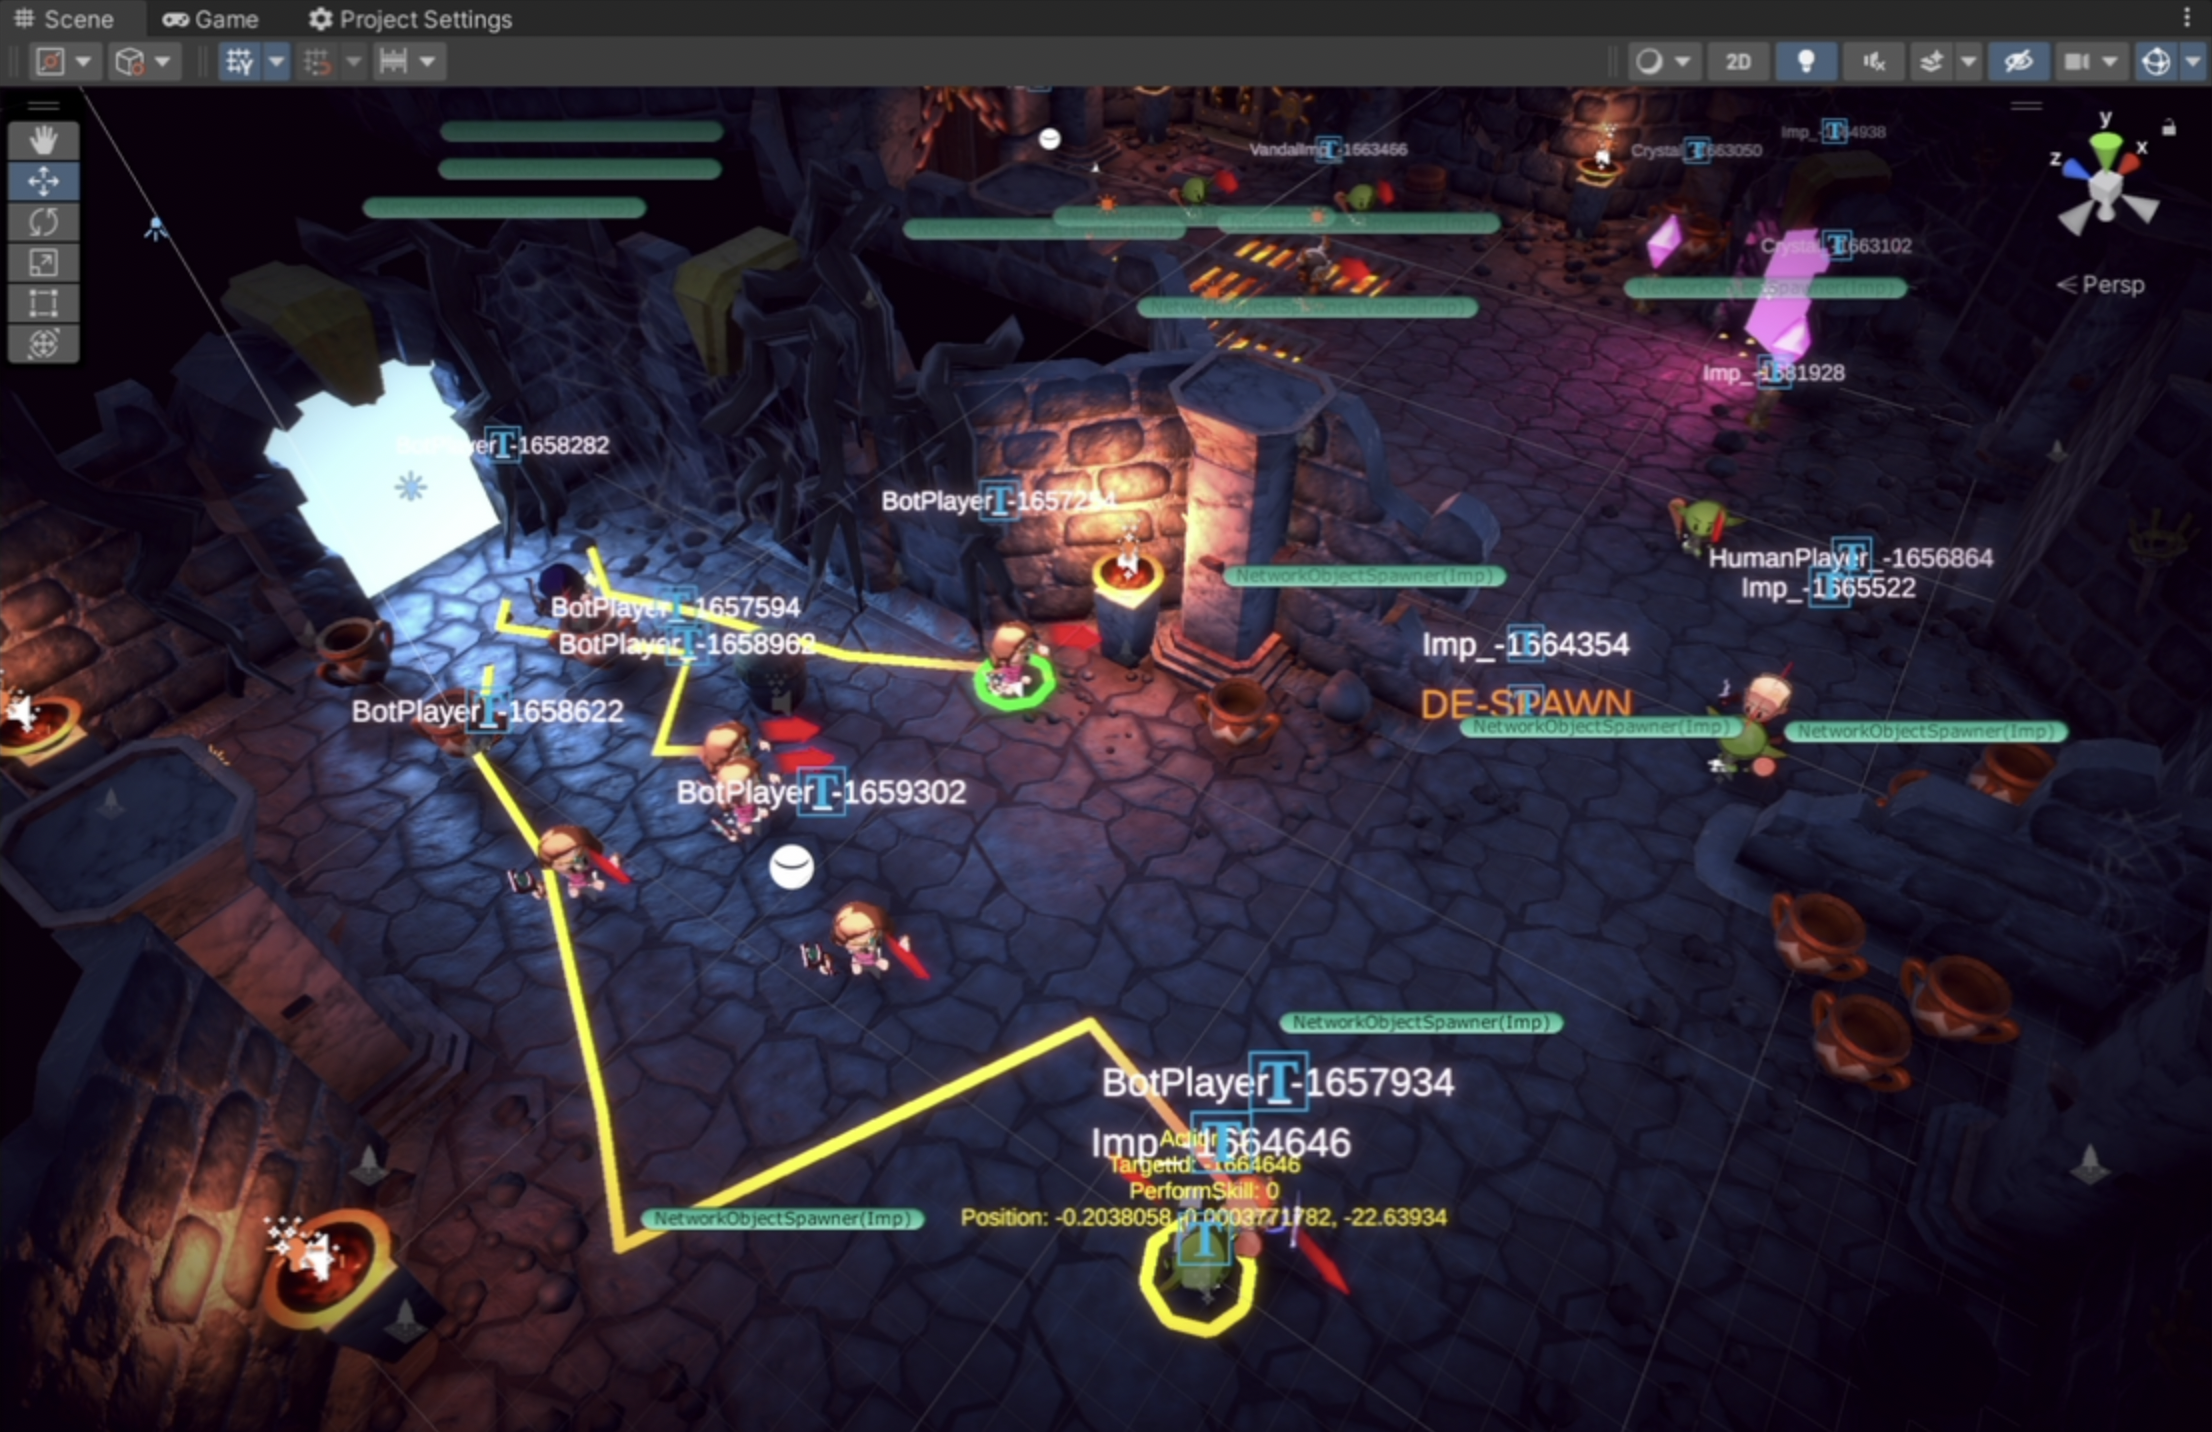
Once your tests have completed, you can view their results on Regression Games by navigating to the History section of the Running Bots tab. From this page you can download bot logs for the test session which contain output from your bot-code. You can also download in-game replay data which can be loaded in the Unity Editor to watch the movements and actions of each bot, as well as analyze the validations they performed. See the In-Editor Replay for instructions on how to load replay data.